Most punctures do not come from bad luck. A lot of them, along with sluggish handling and unexplained fatigue on the bike, trace straight back to riding at the wrong tyre pressure. The number printed on your tyre sidewall is just the start of the story, and hitting that number accurately is where most riders fall short.
By the end of this article you will know why gauge accuracy makes a real difference, how digital gauges compare to analogue, and exactly what to look for when choosing one. You will also have a practical checklist to use before every ride.
Note for Australia:
- Australian summers push tyre pressure up significantly. A tyre pumped up in the cool of the morning will read higher after sitting in the sun or after a long drive with the bike on the roof.
- Chip-seal and rough bitumen surfaces common on rural and regional roads respond very differently to tyre pressure than smooth metropolitan paths, so getting the number right matters even more out on the open road.
- Tubeless setups are increasingly popular across gravel and MTB riding in Australia. These setups are more sensitive to pressure variance, and an accurate gauge is not optional for running them well.
At a glance:
- Digital gauges are generally more accurate and easier to read than analogue or pump-integrated gauges.
- Running even a few PSI off your target pressure affects rolling resistance, handling, and puncture risk.
- Tubeless and gravel setups are the most sensitive to pressure variance and benefit most from a standalone digital gauge.
- Check your tyre pressure before every ride, not just when a tyre looks soft.
Key takeaways:
- A standalone digital gauge is one of the cheapest and most practical cycling tools you can own.
- Pump gauges are a useful backup but should not be your primary accuracy reference.
- Australian heat, rough roads, and tubeless adoption make accurate pressure checking more important here than in many other markets.
Why Tyre Pressure Accuracy Actually Matters on the Bike
Tyre pressure is not just about avoiding flats. It directly affects how your bike rolls, corners, and absorbs road vibration. Get it wrong in either direction and you are either fighting unnecessary rolling resistance or risking a pinch flat on every pothole.
The relationship between pressure and performance is not a straight line. Research from tyre pressure and rolling resistance testing shows that over-inflating on rough surfaces can actually increase rolling resistance because the tyre stops conforming to the road and starts bouncing over it instead. That is the opposite of what most riders expect.
Rider weight, tyre width, and surface type all shift where your optimal pressure sits. A heavier rider on a 25mm road tyre needs a meaningfully different pressure to a lighter rider on the same tyre. Tools like the tyre pressure calculator from 99 Spokes can help you dial in a starting point based on your specific variables.
The Real-World Cost of Running the Wrong Pressure
A few PSI off target might not feel dramatic on a smooth bike path. But on a long ride, rough road, or technical trail, it compounds quickly. Here is what goes wrong at each end of the scale.
- Too high: Harsh ride, reduced grip, tyre bounces over bumps, can increase rolling resistance on rough surfaces.
- Too low (tubed): Increased pinch flat risk, sluggish cornering, higher rolling resistance on smooth surfaces.
- Too low (tubeless): Risk of the tyre burping air or the bead unseating under load, sealant pooling unevenly, poor cornering feedback.
- Slightly off but not obviously wrong: Subtle handling changes you might blame on fatigue or road conditions, small efficiency losses that add up over a long ride.
The Bicycle Network tyre pressure advice recommends checking pressure before every ride, not just when a tyre looks visually flat. That recommendation exists for good reason.
Digital vs Analogue Tyre Pressure Gauges
The gauge built into your floor pump is not useless. It gets you close, and for casual riders that is often enough. But if you are dialling in tubeless pressures, managing weight-based adjustments, or riding in conditions where a few PSI matters, close is not close enough.
Here is a straightforward comparison of the main gauge types you will encounter.
| Gauge Type | Typical Accuracy | Readability | Best For | Limitation |
|---|---|---|---|---|
| Floor pump (built-in) | Variable, can drift over time | Easy to read | Quick inflation check | Loses accuracy as pump ages |
| Analogue standalone | Better than pump gauges | Dial can be hard to read in low light | Workshop use, rough checking | Dial can stick or drift |
| Digital standalone | Generally the most accurate | Clear digital display | Precision work, tubeless, racing prep | Needs a battery |
Where Analogue Gauges Fall Short
Analogue gauges use a mechanical dial and needle. They are reliable but they have real limitations. The needle can stick slightly, giving you a reading that is a PSI or two off. The dial markings are fixed and not always easy to read precisely at lower pressures, which is exactly where MTB and gravel riders need the most accuracy.
Pump-integrated gauges are even more variable. They measure pressure at the pump head, not at the valve seat, which introduces a small but meaningful error. The gauge mechanism in a floor pump is also subject to wear and is not typically user-calibrated. As Sheldon Brown's technical reference on tyre pressure notes, pump gauges are a known weak point in accuracy for cyclists who need precise measurements.
What Makes a Digital Gauge More Reliable
A quality digital gauge reads directly off the valve, displays in fine increments, and removes the parallax and needle-sticking issues you get with analogue dials. The reading is instant and unambiguous. You either hit your target or you did not.
Key reliability advantages of digital gauges include:
- Fine measurement increments, often to 0.5 PSI or better.
- Clear backlit displays for early morning or evening rides.
- Unit switching between PSI, BAR, and kPa (more on that below).
- Consistent readings not affected by dial drift or spring wear.
Key Features to Look for in a Digital Tyre Pressure Gauge
Not all digital gauges are equal. Some are built for workshop use and some are designed for a jersey pocket. Knowing what to prioritise before you buy saves you from ending up with something that works once and then lives in a drawer.
The features that matter most for cyclists:
- Accuracy rating: Look for a gauge with a stated accuracy of plus or minus 1 PSI or better. Better quality gauges will specify this in the product details.
- Pressure range: Make sure it covers your tyre type. Road tyres typically run 80 to 130 PSI. MTB and gravel run much lower, often 15 to 40 PSI. A gauge that only goes to 60 PSI is useless for road bikes.
- Unit switching: PSI, BAR, and kPa are all used on pumps and tyre packaging in Australia. Being able to switch units on the gauge itself saves you doing mental conversions at 6am.
- Build quality: A rubberised body and metal valve connector will outlast a cheap plastic housing. Gauges take knocks.
- Bleed valve: A bleed or release button lets you drop pressure in small increments without having to re-pump. Essential for tubeless setups where you are dialling in from above.
- Portability: A compact gauge fits in a saddlebag or jersey pocket for checking pressure at the car before a trail ride.
For a broader sense of what options are available, Bicycling magazine's roundup of bike tyre pressure gauges covers the practical differences between digital and analogue options in detail.
PSI, BAR, and kPa - a Quick Reference
Australian pumps, gauges, and tyre packaging use all three units. If you have ever stood at a servo air pump staring at a kPa reading when your tyre spec is in BAR, you know how annoying this is. Here is a simple reference.
| Unit | Common Use | Quick Conversion |
|---|---|---|
| PSI (pounds per square inch) | Most cycling gauges and tyres | 1 BAR = approx 14.5 PSI |
| BAR | European tyre and pump labelling | 100 kPa = 1 BAR |
| kPa (kilopascals) | Australian servo air pumps, some pumps | 100 PSI = approx 689 kPa |
A digital gauge with unit switching removes this friction entirely. It is one of the most useful practical features for Australian riders.
Presta vs Schrader - Making Sure Your Gauge Works with Your Valves
Presta valves are the narrow-threaded valves found on most road, gravel, and MTB bikes. Schrader valves are the wider car-style valves found on some hybrid and kids bikes, and increasingly on some MTB and e-bike wheels. A gauge that only works with one valve type will leave you stranded at the wrong moment.
Most quality standalone digital gauges include a dual-head or switchable head that covers both Presta and Schrader. Check this before buying. If you are running a mix of bikes in your household, a dual-compatible gauge is the only sensible choice.
Presta valves require a locking ring to be loosened before you can read or add pressure. Make sure you understand this step, as pressing a gauge onto a locked Presta valve will give you a zero reading and can damage the valve core if you force it.
Tyre Pressure Considerations for Australian Riding Conditions
Australia throws a few specific curveballs at tyre pressure management that riders in cooler climates do not face as often. If you are riding in summer, driving to a trailhead, or regularly riding on chip-seal roads, these considerations apply directly to you.
Heat, Road Surface, and Tyre Pressure in Australia
Air expands when it heats up. A tyre inflated at 7am in a 15-degree garage will read noticeably higher after sitting on a dark car roof rack for two hours in 35-degree heat, or after an hour on hot bitumen. This is not a dramatic swing, but it can push you outside your optimal range, particularly on road bikes running closer to maximum recommended pressures.
The practical approach most experienced Australian riders use:
- Inflate slightly below your target if you know conditions will heat up significantly before or during the ride.
- Check pressure at the trailhead or event carpark, not just at home.
- In summer, do your pressure check in the shade, not in direct sun.
- For gravel and MTB, run toward the lower end of your optimal range in hot conditions to maintain compliance on rough surfaces.
Chip-seal roads, common across regional and rural Australia, are punishing on over-inflated tyres. Running the correct pressure on chip-seal actually improves both comfort and rolling efficiency. The BikeExchange Australia tyre pressure guide addresses temperature effects and Australian surface conditions as part of their practical guidance for local riders.
Tubeless Tyre Pressure - Why Accuracy Is Non-Negotiable
Tubeless setups operate in a narrower pressure window than tubed tyres. Too low and you risk the bead unseating under cornering load, which results in an instant flat and a sealant-covered wheel. Too high and you lose the compliance benefit that makes tubeless worth running in the first place.
Manufacturer pressure recommendations for tubeless setups are specific and vary by rider weight and tyre width. As Zipp's tyre pressure guidelines note, inaccurate measurement can push you outside safe and optimal ranges without you realising it. A pump gauge that is 3 to 5 PSI off is not a minor problem when your target pressure is 22 PSI on a gravel tyre.
For tubeless riders, a dedicated standalone digital gauge is the right tool for initial setup, regular checks, and any mid-season adjustments.
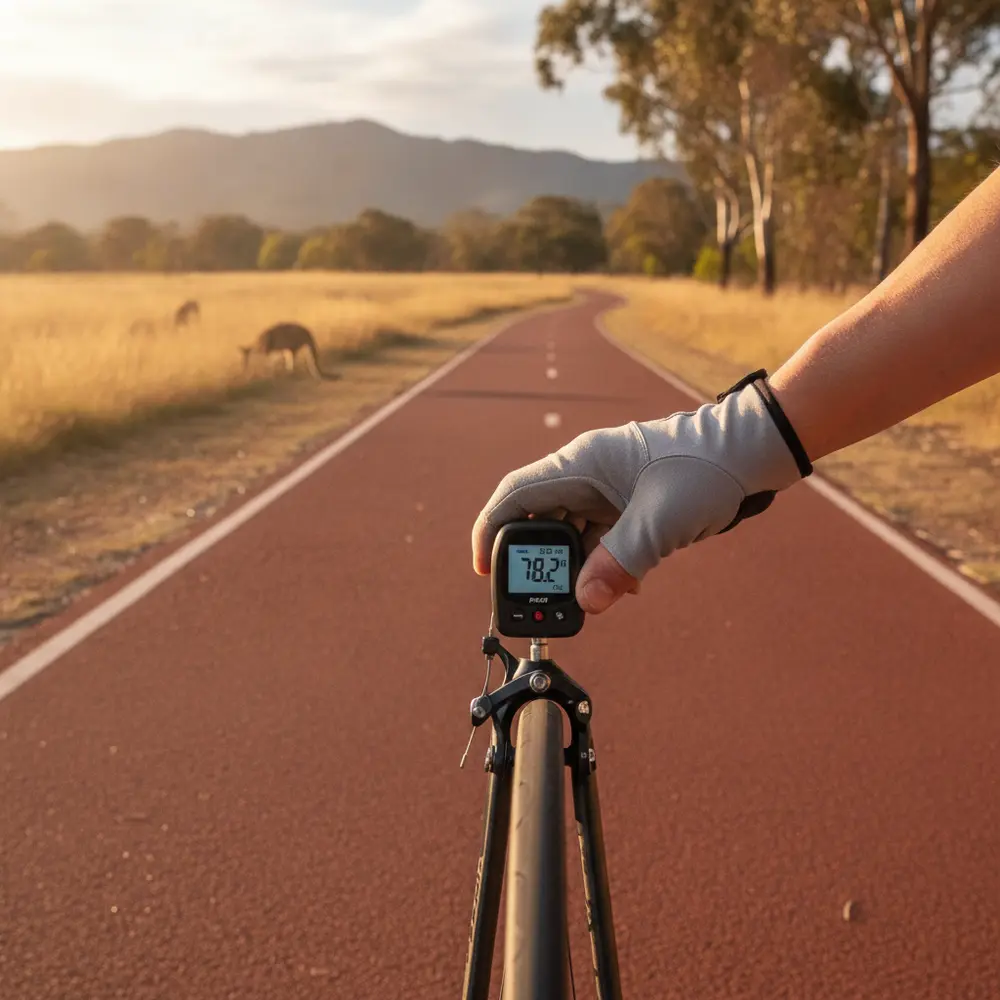
How to Use a Digital Gauge Correctly Every Time
Even the best gauge gives a bad reading if you use it incorrectly. Here is the standard process that gives consistent results.
- For Presta valves, loosen the locking ring at the top of the valve before attaching the gauge head. Do not skip this step.
- Press the gauge head firmly and squarely onto the valve. A crooked connection leaks air and gives a false low reading.
- Read the pressure immediately. On Presta valves, the gauge will drop slightly when you release it as a small amount of air escapes. This is normal.
- If you need to adjust pressure down, use the bleed valve on the gauge to release small amounts of air, then re-check.
- Re-tighten the Presta locking ring after you are done. A loose locking ring can vibrate open during a ride.
Pre-Ride Tyre Pressure Checklist
Use this checklist before every serious ride. It takes less than two minutes and removes the most common causes of preventable punctures and poor handling.
- Check the tyre type and target range. Road tyres typically 80 to 130 PSI, gravel 30 to 60 PSI, MTB 20 to 40 PSI. Use the tyre sidewall and your rider weight as the starting reference. The Pushys tyre pressure guide for Australian cyclists has a solid discipline-by-discipline breakdown.
- Account for temperature. If it is a hot day or you are driving to the ride, inflate slightly below target or re-check at the start.
- Verify valve compatibility. Presta locking ring loose before gauging. Schrader cap removed.
- Use your standalone digital gauge, not just your pump gauge. Confirm the reading is within your target range, not just approximately correct.
- Tubeless check: Listen for any slow hiss that suggests a bead not fully seated. Re-inflate and re-seat if needed.
- Post-drive check: If the bike has travelled on a roof rack or in a car boot, always re-check pressure at the destination before riding.
Common Mistakes to Avoid
- Relying only on the pump gauge. Pump gauges are useful for getting air in, not for precision verification.
- Checking pressure by squeezing the tyre. This tells you almost nothing useful at road bike pressures and is unreliable even on MTB tyres.
- Using sidewall maximum pressure as a target. The maximum rating is a safety ceiling, not a riding recommendation. Your optimal is below that, often well below.
- Ignoring temperature changes. Pressure is not static. It shifts with heat and cold. A morning check does not guarantee correct pressure at midday in summer.
- Not re-checking after a long drive. Pressure can shift during transport due to temperature changes in the vehicle or on the roof rack.
- Skipping the Presta locking ring step. Failing to loosen it before gauging gives a false zero reading and can damage the valve core.
If You Are New to Checking Tyre Pressure
- Start with the pressure range printed on your tyre sidewall. Pick the midpoint as your first target.
- Buy a standalone digital gauge early. It is inexpensive and immediately useful.
- Check pressure before every ride until it becomes habit. You will quickly develop a feel for what feels right versus wrong.
- Learn which valve type your bike uses (Presta or Schrader) before buying a gauge.
- Use a tyre pressure calculator to get a weight-adjusted starting recommendation for your specific tyre width.
If You Have Used a Pump Gauge Before
- Cross-check your floor pump gauge against a standalone digital gauge. You may be surprised how much they differ.
- If you are running tubeless, commit to a standalone gauge for all pressure checks. The pump gauge is not accurate enough for the pressure ranges tubeless gravel and MTB tyres use.
- Pay attention to pressure drift across seasons. A setup that was dialled in last winter may need revisiting in the Australian summer.
- Consider keeping a dedicated gauge in your saddlebag for checking at the trailhead or event venue.
- Use the bleed valve feature actively. Dialling pressure down from slightly above target is easier and more accurate than trying to hit exact pressure on the way up.
Frequently asked questions
How accurate are floor pump gauges for cycling?
Floor pump gauges vary considerably. They measure at the pump head rather than at the valve, which introduces a small but real error. They also drift with wear over time. For casual riding they are fine as a rough guide, but for tubeless setups, precision road riding, or weight-adjusted gravel pressure, a standalone digital gauge gives you a more reliable reading.
Do I need a separate gauge for Presta and Schrader valves?
No, as long as you buy a dual-compatible gauge. Most quality standalone digital gauges include a head that works with both valve types, either with a flip adapter or dual fittings. Check the product details before buying, particularly if you have both road (Presta) and hybrid or cargo bikes (Schrader) in your household.
Does tyre pressure change in hot Australian weather?
Yes. Air expands as temperature increases. A tyre inflated in a cool garage will read higher after sitting in the sun or after an hour of hot road riding. The effect is more relevant at the extremes of your pressure range. The practical response is to check pressure in shade at the start of the ride rather than relying solely on your pre-drive inflation.
What pressure accuracy should I look for in a digital gauge?
A stated accuracy of plus or minus 1 PSI is a reasonable standard for cycling use. Better quality gauges will specify their accuracy tolerance in the product description. For MTB and gravel tubeless setups running low pressures, the tighter the tolerance the better, because you are working with a smaller overall pressure range.
How often should I replace or calibrate a digital gauge?
Most consumer-grade digital gauges do not offer field calibration. The practical approach is to cross-check your gauge against a known-good reference gauge periodically, and replace it if you notice it giving inconsistent readings or the display becomes unreliable. Quality gauges used with reasonable care should remain accurate for a number of years. Replacing the battery before it gets critically low also helps maintain consistent sensor performance.
Wrapping Up
A digital tyre pressure gauge is a small investment that pays off every time you head out on the bike. Here is the short version of what to take from this article.
- Accurate tyre pressure affects rolling resistance, handling, and puncture risk in measurable ways.
- Pump gauges are a useful starting point but should not be your final accuracy check.
- Digital gauges offer better readability, finer increments, and unit switching, all of which matter in real Australian riding conditions.
- Tubeless setups are the most sensitive to pressure variance and make a standalone digital gauge essential rather than optional.
- Check pressure before every ride, account for heat and transport, and use the checklist above until it becomes habit.
If you want to explore more practical cycling tools for Australian riders, or are looking for bike maintenance tips to go alongside your new gauge habit, there is plenty more on the blog to dig into. And if you have a specific question about pressure for your setup, get in touch with us and we will point you in the right direction.
This is educational content, not financial advice.