Your disc brakes are the single most important safety system on your mountain bike, and Australian trails test them harder than most. Red dirt from Stromlo, clay mud from Victorian singletrack, summer heat on exposed fire roads and the sustained wet descents at places like Blue Derby in Tasmania all put your brakes under real stress.
By the end of this guide you will know how to inspect, clean, replace pads, bleed hydraulic systems and troubleshoot the most common disc brake problems at home. You will also know when it is time to stop, pack it in, and take the bike to your local shop.
Note for Australia:
- Red dust from trails like Stromlo (ACT), Nerang (QLD) and Dwellingup (WA) is an abrasive contaminant that accelerates rotor and pad wear faster than most European or North American conditions.
- Sunscreen and insect repellent on your fingers near the wheel are a genuinely local hazard. Apply before touching the bike, and keep greasy hands away from rotors and pads.
- DOT fluid (used by SRAM) is hygroscopic and absorbs moisture from the air. In humid coastal climates like Queensland or northern NSW, this can shorten your bleed interval.
At a glance:
- Inspect pads, rotor and lever feel before every ride.
- Clean rotors with isopropyl alcohol, never with chain lube or WD-40 nearby.
- Replace pads before the compound wears to the backing plate.
- Bleed hydraulic brakes when the lever feels spongy or pulls too close to the bar.
- Know your fluid type. Shimano uses mineral oil, SRAM uses DOT 4 or DOT 5.1. Mixing them damages seals.
Key takeaways:
- Most intermediate riders can handle inspections, cleaning and pad swaps at home with basic tools.
- Bleeding is learnable but requires care. Incorrect bleeding introduces air and makes performance worse, not better.
- A rotor worn below minimum thickness, a bent calliper mount, or persistent hydraulic issues are good reasons to visit a shop.
Why Disc Brake Maintenance Matters for Australian MTB Riders
Disc brakes on a mountain bike do not look after themselves. Pad compound wears down with every ride, rotors pick up contamination, and hydraulic fluid degrades over time. Neglect any of those three things and your stopping power drops quietly in the background until one day on a steep section you notice the brakes feel nothing like they used to.
The good news is that most of the maintenance is straightforward. A consistent pre-ride check and a bit of housekeeping after muddy or dusty rides will extend the life of your components significantly and keep your braking sharp.
How Australian Conditions Affect Your Brakes
Australian trails cover an unusual range of conditions for a single country. You have the fine red dust of the ACT and WA, thick clay mud in Victoria and southern NSW through winter, exposed granite and sandstone in Queensland, and wet roots and rock in Tasmania. Each of those environments loads your brakes differently.
- Dust: Acts as a fine abrasive between pad and rotor. Accelerates wear and can cause squealing.
- Mud and clay: Clogs the calliper and can pack into the pad slot, reducing clearance and causing drag.
- Heat: Summer riding on long fire road descents can cause brake fade, especially with resin pads pushed beyond their temperature range.
- Moisture: Wet trails increase contamination risk and, for SRAM DOT fluid systems, accelerate moisture absorption into the fluid.
You can check Australian MTB trail conditions on Trailforks before heading out so you know what surface and season you are dealing with.
Understanding Your Disc Brake System
Hydraulic vs Mechanical Disc Brakes - Key Differences
Most modern MTBs run hydraulic disc brakes, but plenty of older bikes and budget builds still use mechanical (cable-actuated) systems. Knowing which you have matters for maintenance.
| Feature | Hydraulic | Mechanical |
|---|---|---|
| Power and modulation | More consistent feel, better modulation on long descents | Good enough for most trail riding, less progressive |
| Maintenance complexity | Requires bleeding when fluid degrades or air enters | Cable adjustment only, no fluid involved |
| Common brands | Shimano, SRAM, TRP, Magura | TRP, Tektro, Clarks |
| Fluid type | Shimano: mineral oil. SRAM: DOT 4 or DOT 5.1 | No fluid required |
| Home serviceability | Pad swaps easy, bleeding requires a bleed kit and care | Fully serviceable with basic tools |
If you ride a hydraulic system, the fluid type is critical. Shimano uses mineral oil. SRAM uses DOT fluid. Never mix the two. Using the wrong fluid can damage seals and void any warranty. Check SRAM's official MTB brake service guides or Shimano's official technical documentation if you are unsure which fluid your brakes need.
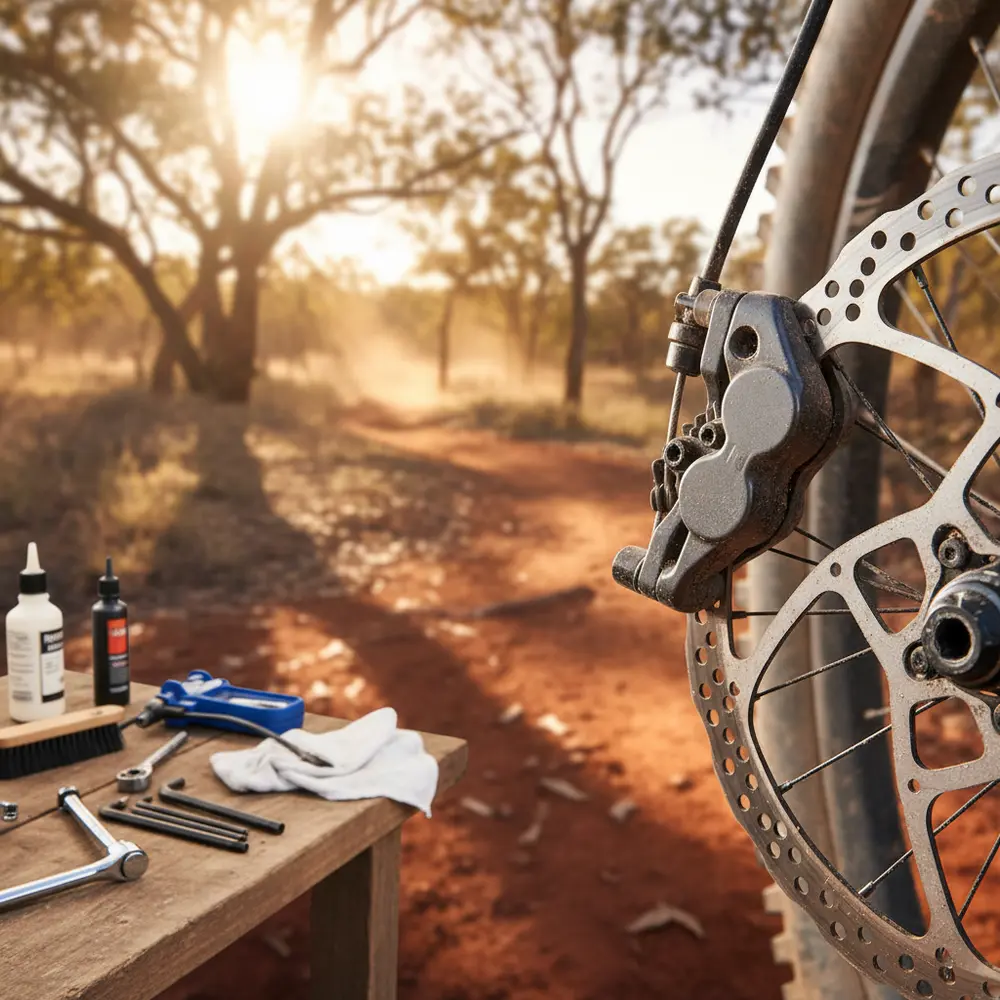
How to Inspect Your Disc Brakes Before Every Ride
A pre-ride brake check takes about two minutes. Get into the habit and you will catch problems before they become trail-side emergencies.
Checking Pad Wear, Rotor Condition and Lever Feel
- Squeeze the lever: It should feel firm and engage well before reaching the bar. A spongy or mushy feel means there may be air in the system or degraded fluid.
- Check pad thickness: Look through the calliper slot at the pad compound. If it is close to or flush with the metal backing plate, replace the pads. Most pads need replacing well before you reach the backing plate.
- Inspect the rotor: Look for deep grooves, heat discolouration (blue-purple tones), cracks, or noticeable warping. Check the minimum thickness stamped on the rotor itself. For most Shimano MTB rotors this is 1.5mm, but always check the number on your specific rotor and refer to Shimano rotor minimum thickness specifications for confirmation.
- Spin the wheel: Watch the rotor pass through the calliper. Any rubbing, consistent ticking or wobble points to a bent rotor or misaligned calliper.
- Check rotor bolts: Give each bolt a quick check. Loose rotor bolts are a genuine safety issue.
Cleaning Your Disc Brakes the Right Way
Brake contamination is one of the most common causes of squealing and loss of power. The rules here are simple but worth following every time.
What to Use and What to Avoid
Use isopropyl alcohol (IPA) on a clean lint-free cloth to wipe down rotors. It evaporates cleanly and does not leave residue. Dedicated brake cleaner spray is also effective and available from most Australian bike shops or online from retailers like Pushys.
Things to keep away from your rotors and pads:
- Chain lube, WD-40 or any lubricant spray within at least a metre of the wheel
- Sunscreen and insect repellent on your fingers (apply before you touch the bike)
- Washing-up detergent or household cleaners that leave a residue
- Compressed air blasting mud directly into the calliper
If pads have been contaminated by oil or grease, they may be beyond saving. Lightly contaminated pads can sometimes be recovered by sanding the surface on fine sandpaper and bedding them back in, but this is not guaranteed. When in doubt, fit a fresh set. The Park Tool disc brake service guide has a clear explanation of how to identify contaminated pads and whether they can be salvaged.
Replacing Disc Brake Pads Step by Step
Pad replacement is well within reach for any intermediate home mechanic. You need a flat-head screwdriver or a pin punch, a set of needle-nose pliers, and the correct replacement pads for your calliper model.
- Remove the wheel to give yourself clear access to the calliper.
- Remove the retaining pin or clip holding the pads in place (most callipers use a split pin or a threaded bolt).
- Slide the old pads out. Take note of the orientation before removing them.
- Push the calliper pistons gently back using a tyre lever or the flat of a screwdriver, with a clean rag behind them to catch any fluid overflow.
- Slide the new pads into position and refit the retaining pin or clip securely.
- Refit the wheel and pump the brake lever slowly until the pads contact the rotor and lever feel returns.
- Bed the pads in before your next proper ride. This means a series of moderate-to-firm stops from around 20-25 km/h, allowing the brakes to cool between each. Skipping this step leads to reduced bite and glazed surfaces. Singletracks has a solid walkthrough on how to bed in MTB disc brake pads if you want the full detail.
Sintered vs resin pads: Sintered (metallic) pads handle heat and wet conditions better, making them a solid choice for most Australian trail riding. Resin pads are quieter and offer better initial bite in dry conditions but fade sooner under sustained heat. For mixed or wet conditions, sintered is the more durable option.
How and When to Bleed Hydraulic Disc Brakes
Bleed your hydraulic brakes when the lever feels spongy, when it pulls close to the bar before engaging, or after a long period of storage. For most riders doing regular trail riding, once or twice a year is a reasonable interval, though riders on SRAM DOT systems in humid climates may want to check fluid condition more frequently as DOT fluid is hygroscopic and absorbs moisture over time.
Bleeding Shimano vs SRAM vs TRP - What Changes Between Brands
- Shimano: Uses mineral oil. Bleed port is a small screw on the lever body. You will need Shimano mineral oil and a Shimano bleed kit. The process involves gravity and a syringe.
- SRAM: Uses DOT 4 or DOT 5.1 depending on model. Uses a two-syringe method. SRAM's bleed kit is specific to their system. Always check which DOT grade your specific model requires before buying fluid.
- TRP and Magura: TRP uses mineral oil on most models. Magura uses their own Magura Royal Blood mineral oil. Procedures vary, so always check the brand's service documentation first.
Bleeding is learnable at home. However, if you introduce air rather than remove it, you will make the system worse. If the lever still feels spongy after two attempts, take it to a shop. Most good Australian bike shops can bleed brakes while you wait. You can find bleed kits and the correct fluids from retailers like Pushys or check the 99 Bikes maintenance hub for locally available options.
Rotor Truing, Replacement and Torque Specs
A slightly bent rotor is common after a knock or a fall. Minor bends can be trued using a rotor truing fork or carefully with an adjustable spanner over the specific bent section. Work slowly and in small adjustments. Do not try to force a badly bent rotor back into shape.
Replace the rotor if it is below the minimum thickness stamped on its surface, shows cracking, has deep grooves worn into the braking surface, or cannot be trued adequately. Rotor bolts should be torqued correctly and in a star pattern to avoid warping. Refer to your brand's service documentation for the specific torque value, as this varies between brands and mount standards (IS vs PM). Do not overtighten.
Troubleshooting Common Disc Brake Problems
Squealing, Rubbing, Spongy Lever Feel and Brake Fade
Use this flow to work through the most common issues:
| Symptom | Likely cause | Check | Fix |
|---|---|---|---|
| Squealing | Contaminated pads or rotor, or glazed pads | Look for oily sheen on rotor or pad surface | Clean rotor with IPA. Replace pads if contaminated. Sand and bed-in lightly glazed pads. |
| Rubbing or ticking | Bent rotor or misaligned calliper | Spin wheel and watch rotor through calliper | True rotor or re-centre calliper by loosening mounting bolts, squeezing lever and re-tightening. |
| Spongy lever | Air in hydraulic system or degraded fluid | Check lever feel, look for fluid leaks | Bleed the system. If persistent, take to a shop. |
| Brake fade on descents | Heat build-up, often resin pads pushed beyond limit | Does it improve after brakes cool down? | Switch to sintered pads. Check rotor size is appropriate for trail type. |
| Loss of power | Worn pads, contamination, or air in system | Check pad thickness and rotor condition | Replace pads. Clean rotor. Bleed if still underperforming. |
Common Mistakes to Avoid
- Applying chain lube near the wheel and getting overspray on the rotor.
- Touching rotors or new pads with bare hands. Natural skin oils contaminate the surface.
- Pushing the brake lever with the wheel removed and no pad spacer in place. This pushes pistons out and is a pain to fix.
- Using the wrong fluid type. Mineral oil and DOT fluid are not interchangeable and can destroy seals.
- Ignoring a spongy lever and riding on it. It will not improve on its own.
- Fitting new pads without bedding them in and then wondering why bite feels weak for the first few rides.
If You Are New to Disc Brake Maintenance
- Start with cleaning and visual inspection. These require no special tools and build your confidence fast.
- Watch your specific brake brand's official pad replacement video before pulling anything apart.
- Always insert a pad spacer (or a folded piece of cardboard) between the pistons when the wheel is out.
- Buy the correct pad for your calliper model. Not all pads fit all callipers even within the same brand.
- Your local bike shop is not the enemy. A first bleed done by a mechanic while you watch is worth every cent.
If You Have Bled Brakes Before
- Check your fluid condition annually even if lever feel seems fine. DOT fluid degrades without obvious symptoms.
- Invest in a quality bleed kit specific to your brand. Generic kits can have fitment issues that make the job harder.
- Consider upgrading to sintered pads if you are still running resin on technical or steep trail networks.
- After any bleed, do a proper bedding-in run before relying on the brakes on a technical descent.
- Keep a spare set of pads in your riding kit if you are heading somewhere remote like the Flinders Ranges or Dwellingup.
Recommended Tools and Products Available in Australia
You do not need a full workshop to maintain disc brakes at home. Here is a practical kit list:
- Isopropyl alcohol (90% or higher) and lint-free cloths
- Dedicated brake cleaner spray (available at most bike shops)
- Brand-specific bleed kit (Shimano, SRAM or TRP as appropriate)
- Correct brake fluid (Shimano mineral oil, SRAM DOT 4 or 5.1)
- Rotor truing fork or a flat-jaw adjustable spanner for minor bends
- Torque wrench for rotor bolts
- Replacement pads in the correct compound for your calliper
For parts and consumables, Pushys stocks a wide range of brake components from Shimano, SRAM, TRP, Magura and Hope with shipping to most Australian states. 99 Bikes has stores nationally and their bike maintenance hub is worth bookmarking. Your local bike shop is always a solid option for parts and advice, and worth supporting.
For more general bicycle maintenance tips and to get the most from your riding, have a read of our bike maintenance articles on Segment Club. If you want gear and component advice for Australian conditions, our gear review section is a good place to browse. And if you are planning your next big ride, check out our Australian trail guides to match your brake setup to the terrain ahead.
Frequently asked questions
How often should I replace my MTB disc brake pads?
It depends on how much you ride and in what conditions. A rough guide is to inspect pads every few rides and replace them when the compound is worn thin, well before it reaches the metal backing plate. Dusty or muddy Australian trails will wear pads faster than dry hardpack. Some riders get a full season from a set, others wear through pads in a handful of long rides.
Can I use WD-40 to clean my disc brake rotors?
No. WD-40 and similar products leave an oily residue that will contaminate your pads and cause loss of braking power and squealing. Use isopropyl alcohol (IPA) on a clean lint-free cloth or a dedicated brake cleaner spray. These evaporate cleanly without leaving residue.
What does a spongy brake lever mean and is it dangerous?
A spongy lever usually means there is air in the hydraulic system or the fluid has degraded. It reduces braking power and feel, and yes, it is a safety concern on technical terrain. Do not ignore it. The system needs bleeding. If you are not confident bleeding brakes at home, take the bike to your local shop before your next ride.
Do I need to bed in new brake pads?
Yes. Bedding in transfers a thin layer of pad material onto the rotor surface, which improves braking bite and consistency. Skip it and you will likely have weaker initial braking and possibly uneven wear. The process takes about ten minutes in a quiet car park. Find a clear stretch of road or trail and do a series of firm stops from moderate speed, allowing the brakes to cool between each run.
Should I use sintered or resin pads for Australian trails?
For most Australian trail riding, sintered (metallic) pads are the more practical choice. They handle heat and wet conditions better, resist fade on longer descents, and last longer in dusty or muddy conditions. Resin pads are quieter and offer slightly better feel in cold dry conditions, but they fade more easily under sustained heat. If you ride a mix of conditions, sintered is a sensible default.
Quick summary
- Inspect lever feel, pad thickness and rotor condition before every ride. It takes two minutes.
- Use isopropyl alcohol to clean rotors. Keep all lubricants, sunscreen and chain lube well away from brake surfaces.
- Replace pads before they wear to the backing plate, and always bed new pads in properly.
- Know your fluid type. Shimano uses mineral oil, SRAM uses DOT. Never mix them.
- Bleed when the lever feels spongy, but do it carefully. When in doubt, a local shop is the right call.
Have questions about your specific brake setup or running into an issue we have not covered? Get in touch with us at Segment Club and we will do our best to point you in the right direction.
This is educational content, not professional mechanical advice. Always refer to your brake manufacturer's official documentation for model-specific procedures and specifications, and consult a qualified bike mechanic if you are unsure about any repair.